![]()
Fast-fire
Kilns: Article by Kevin Grealy
SideStoke
home | Fast-fire
home
|
|
Fast-fire
Kilns: Article by Kevin Grealy |
|
|
Fast-fired woodburning kilns …by which I mean the design attributed to Fred Olsen, and variations on it.. There are other kiln types referred to as “fast fire”. This is a brief introduction to the kiln type, its principles, its pros and cons etc. What makes them
different?
Base of the kiln (dense firebrick) from floor to the bottom of the chamber
Kiln plan
Several factors are crucial to the success of this design; The
size (volume) of the fireboxes and ash pits. Several factors are crucial to the success of the firing; Wood
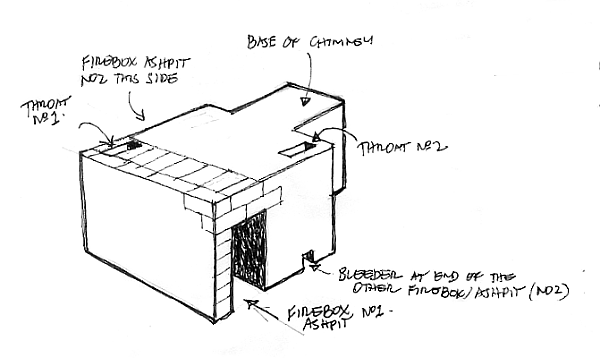
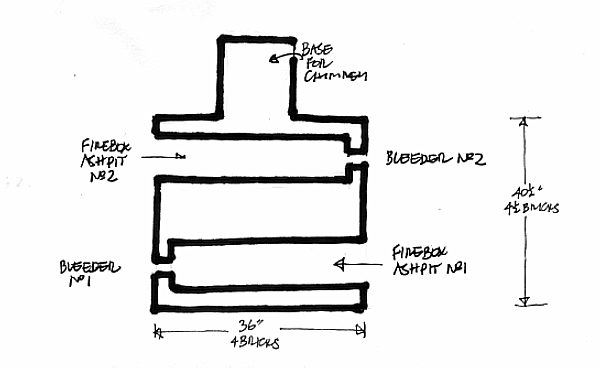
split to suit the required rate of temperature rise The Design Factors…using a 9 cu. ft chamber as an example ( 9 cu ft kiln photos) My kilns always begin with the size and configuration of the shelves to be used (in this case two shelves 18x12 inches) then I consider how best to wrap the bricks around them with a minimum of brick cutting. This has given a floor plan of 4 whole bricks across front and back and 4 ½ bricks along each side (36 inches wide x 40 ½ inches deep, plus a little for mortar.) The fireboxes/ashpits run parallel to the front and back, ie, you fire from the sides. The firemouth should be 18 inches high and 9 inches wide and should run to the opposite wall. It is good practice to leave a 4 ½ x3 inch bleeder opening at the end of the firebox/ashpit. Why? Later in the firing, coals will build up at the back of the grate and ashpit, slowing down the draft. Opening up that bleeder admits air which quickly reduces the buildup of coals and supplies heated secondary air right where you want it…as the gasses are going up the throat into the chamber…exactly what happens in a bourry box. As a bonus, if for some reason you need to rake coals, it is far safer and cooler to do it by pushing from the back ( through the bleeder)than to be pulling them towards you from the front at the firemouth.
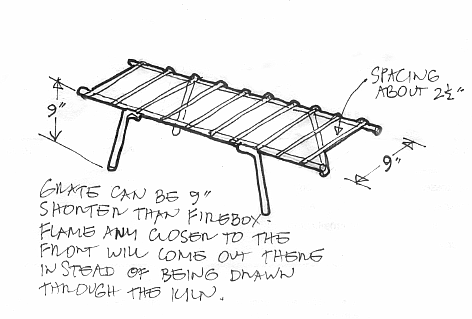
The fire grate is made from steel rod and its bed should be 9 inches from the floor. For most purposes, the firebars should be spaced 2 ½ inches apart. The volume/space above grate is the firebox, and the equally sized space below is the ashpit. The firebox/ashpit has no door during the firing. All will be revealed!
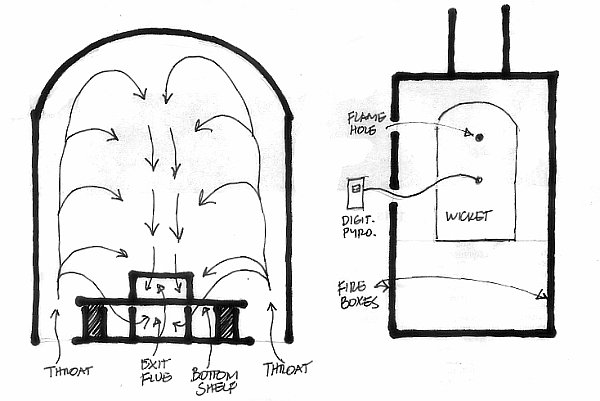
Materials I have built several fastfires at this size and have used different wall profiles for each. The differences are significant. The first model had walls made of 3 inches of K23 bricks dry laid with 1 ½ inches of low-temp (around 900 degrees C) ceramic fibre blanket attached only by the Velcro-like nature of the insulating brick against the fibre. It fired with ease to 1280 C in 4-4 ½ hours where the last ½ hour was a soak to even temperature. The second model had a wall of 3 inches of Orcel brick, 1 ½ inches of loosely packed medium temp. fibre and ¼ inch cellulose cement sheeting rated for 800C. It takes 7 ½ hours to 1280C. I have been told of a hard firebrick version 4 ½ inches backed by 1 ½ inches of fibre which struggled to reach 1280C in 18 hours. So there are your choices, Selection of wall profile is definitely worth considering if you are seeking the fast fire potential of the fast-fire design. The coating on the salt kiln is Zircon flour with as little kaolin and water as is needed to give it a thin, paintable or sprayable coating. I much prefer several fired-on thin coats to a single thick coat, which would be more likely to crawl and peel off. In time, sodium vapours will seep through cracks and begin their cancerlike corrosion behand the zircon layer, but the zircon wash definitely delays that slow death significantly. I much prefer zircon to alumina for salt resist. I keep the alumina for shinos and other orange surfaces. I have found, in versions from 9 cu. ft to 36 cu ft, that 16 feet of stack beyond the floor level is about right. Any more and the kiln will fire unevenly…any less and it probably won’t reach temperature. In my first firing of a 21 cu ft version with the Orcel brick wall profile, the firing graph was almost a straight line from the start of the firing to 1200C. Anticipation from the graph was that 1280C would be reached in another 30 minutes. Then the metal flue collapsed…it was rusted through from 40 firings in the smaller kiln. Nothing I tried would take that kiln over 1200C, though I tried for another 4 hours. For the 9 cu ft version, my exit flue into the chimney is 8x9 inches (72sq inches) and the bottom layer of shelves straddles this opening, so that half of the exit flue is above the shelf and half is below. Each of the two throats (entrances from the fireboxes) is 9x4 ½ inches ( total 81 sq in). In his earlier versions of the fast fire kiln, Fred Olsen employed what he called a “trick brick” which restricted the exit flue to 50% of the dimensions I have given! At about 1200C, you poked a steel rod into the kiln and pushed the “trick brick to one side, so doubling the area of the exit flue I tried it once and the kiln went from 1200-1280C in 10 minutes after poking the trick brick aside…and onto a lovely pot to which it stuck!!!!! The stack/chimney/ flue has a 9x9 inch cross-section up to 10 feet and continues as a circular metal culvert pipe of 9 inch diameter for another 6 feet. The difference between the exit flue and chimney cross-sections probably creates the venturi action described by Nils Lou in his book on kilns. The damper is set at 12 inches above chamber floor level…to give a nice buffer of heat between the damper and the back of the chamber. All brickwork from foundations to chamber floor, and the first 6 ft of chimney are hard firebrick, and the mortar is kaolin and silica sand. The
firing factors…any sized version of this design.
Flame path as seen from door of chamber (left) and position of the flame hole (right). In the earlier
stages of the firing (up to red heat), I use whatever rubbish
timber I have and fire on the floor of the ashpit building up a
bed of coals. Once fuel placed on the grate will ignite from the
heat below, I need to become selective.
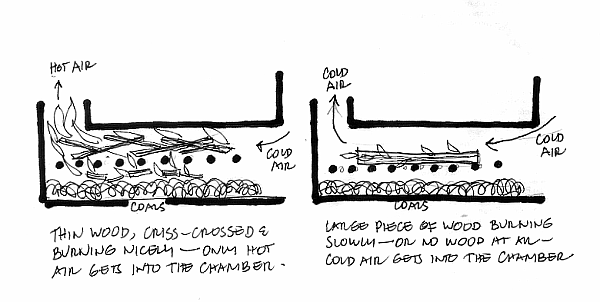
This is one of the
first principles of the fast fire…being able to continually
replace spent wood with fresh wood. While this is happening, the
flame coming off the freshly burning wood is the door of the
firebox. Air from outside the kiln can’t get to the chamber
without going through your burning fuel. The rhythm of
stoking is about knowing what is happening in one firebox so you
can anticipate preparing the other firebox for a smooth
switchover. How do we do that? The length of the
flame coming out of that hole is telling you about the buildup of
pressure inside the kiln. It can be adjusted by operating the
damper. Pressure is important to even temperature. Keeping a good log of the firing is an essential part of learning about wood fired kilns of any type and a digital pyrometer is an essential tool for learning instant information about the effects of your actions. Whenever the graph of temperature takes an uncharacteristic change ( for better or worse), make a note of what you did just prior to that change. For example, a rapid rise in temperature following your use of thinner pieces of wood might become useful information later in the firing when the temperature seems to have slowed down. When the firing has concluded, brick up the firemouths and apply a slurry of sand and clay slip to prevent any cold air entering the fireboxes and slipping up into the chamber. I usually complete firings late at night and seal the kiln in darkness, so that the slightest chink can be found and slurried over. It’s your choice as to if or when you shut the damper. For example, for shinos and teadust glazes, I might quick cool to 1050C then shut the damper and try to hold temp for an hour or so in what should be an oxidising atmosphere.. |