![]()
Editorial notes on digital imaging
Preparing images for web pages | Scanning
Sending images by email | Image editing programs
Scroll down for more links

|
|
Editorial notes on digital imaging Preparing images for web pages | Scanning Sending images by email | Image editing programs Scroll down for more links |
|
Digital images are one of the wonders of the world of computers but they have one substantial problem when it comes to sending them by email or posting them on the internet: the files can be very large. Large files take longer to download (appear on a web page) and longer to send or receive as attachments to emails. The files may exceed the size you are allowed to send or receive as emails. Exactly what you are allowed to do depends on your particular internet service provider.
Sending
images by email.
Image
files can be sent as email attachments but the size of the attached
file must be considered. Your email program will probably quote the
size of the attached file. The text of the email will occupy a
relatively small part of the total email size. I can receive emails
measuring up to 2MB, but emails larger
than 2MB may be deleted by my sevice provider
and they do not tell me that this has been done. If
sending me more than one image it might be necessary to send a series
of emails on consecutive days to get under the limit. I will
acknowledge each email received so you know it got through. The
following steps should be useful if you want to prepare images for
emailing.
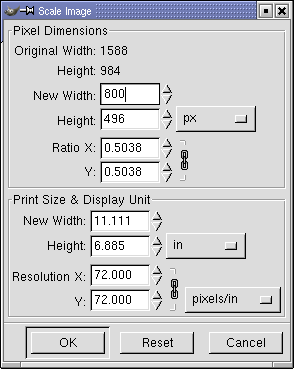
First check the size of the image (as measured in pixels). This web site is written on a monitor at resolution 800x600, so allowing for the toolbars at the top and bottom of the browser screen, and for the fact that I like to see all of a picture without scrolling, I will reduce the image so that its height is 400 pixels or less. So you should scale (re-size) the image in an image editing program (see below) so that it is no higher than 500 pixels (this allows for some cropping by me). Reducing the dimensions of the picture by fifty percent can reduce the size of the image file to one quarter of the original size, so size of the image is important. Figure 2 shows the box for changing the image dimensions in the program called GIMP. In this figure the original size was 1588 pixels wide by 984 pixels wide, and the new size is to be 800 pixels by 496 pixels.
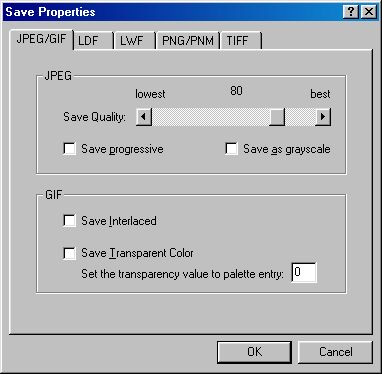
Use the JPG image file format JPG files are compressed, and the amount of compression is a matter of choice. You must check to see how much compression is going to be used or the file may increase in size. In most image manipulation programs using the command File, Save As and specifying JPG format will result in an invitation to set the amount of compression. The compression scale is expressed in various ways, but if 100 represents not much compression, using a setting of 75 will result in an on screen image which is not noticeably degraded. Figure 1 shows the box for setting the JPG compression in the program Irfanview. In Irfanview you reach this box by clicking on the Options button in the File, Save As...dialog box. The slider has been moved to get a compression rated at 80 in that program.
|
Fig 1 |
Fig 2 |
Check the size of the file before sending so that you know what you are doing.
Always say in the text of the email what the attachment is and what its file format is. There are a lot of malevolent attachments around which carry viruses, so if there is no reference to the attachment in the text I tend to send a query to the sender address before opening anything suspicious.
Image
editing programs
Programs for adjusting the size of
your image files need not cost much. Windows 9x users have a number
of free programs available for download from the web. The excellent
Irfan View is completely free, and has
basic image manipulation capabilities along with the facility to
adjust the sizes of images. It comes in a compact 803 KB download.
The splendid
GIMP
program is available at
moderate cost for Linux, Windows and Mac OSX. I have no information
on programs for older Apple systems so perhaps someone who knows will
let me know the cunning thing to do for image editing on Apple
computers. Image editing programs can display the image from an image
file at various magnifications and indicate this with figures like
50%, if half actual pixel size, or 200% if twice actual pixel size.
Concentrate on the number of pixels rather than the apparent size of
the image on your monitor, or make sure the image is displayed at
100%.
Scanning images for display on a computer monitor using a web browser program.
Different scanner settings are needed for scanning for display on a monitor as distinct from scanning for printing. If the right settings are not used the result could be a very large file which must be reduced in size to be sent by email or displayed in full on a web page. The essential thing to remember is that if you are using a web browser program to display an isolated image then computer monitors display images pixel for pixel. This means that one pixel in an image file occupies one pixel on the monitor. Typical pixel settings for monitors are 640 (wide) x 480 (high), 800X600, 1024x768, and so on. An image measuring 800 pixels x 600 pixels will fully occupy the screen of a monitor set to resolution 800x600, will occupy only part of a monitor set to 1024x768, and will not be displayed in full on a monitor set to 640x480. In the case of the monitor set to 640x480 your web browser will let you scroll up and down and left and right so you can see all parts of the image, but not all of it at once. (Note that images displayed in a web page will not necessarily be displayed at their actual pixel size because the web page can tell them to be displayed at some other size. However, it is better to display them at their real pixel size).
You can probably change the display settings for your monitor. If your operating system is Window95, for example, go to My Computer, Control Panel, Display, Settings and see what you are allowed to do. Changing the settings changes the size of the pixels on the screen, so that more or fewer pixels will fit on the screen area. SideStoke pages are written on a monitor set to 800x600 and are best viewed on a similarly set monitor. To allow for parts of the screen occupied by the toolbars of the web browser programs, and to avoid being hideously difficult to view on monitors set to 640x480, the height of the images used on SideStoke is usually 400 pixels or less. Images exceeding this height will be reduced in size by me, so if you are scanning for SideStoke there is no point in scanning them any larger, unless you want to allow for some cropping.
For monitor viewing dpi (dots per inch) really means pixels per inch, so you can set the scanner dpi setting accordingly. (All of what follows assumes 100% scaling when scanning. If you want to know what that means you will have to go to the Scanning Tips website to find out). A common print size is 15cm x 10cm, which is the same as 6inches x 4inches. If you scan a 6 inch (wide) x 4 inch (high) print at 300 dpi you will end up with an image measuring (6x300) pixels x (4x300) pixels. That is, you get an 1800x1200 pixel image, which will be quite large and thus a nuisance. If you set your scanner to scan at 100 dpi you will get an image measuring (6x100) x (4x100) pixels, which is 600x400 pixels and just right for me to work with. If you scan at 75 dpi the image will end up 450x300 pixels, and while I can scale this up with my image manipulation program to resize it to 600x400 pixels, this process will reduce the quality of the image. If you scan it to be larger than I want then I can scale it down without losing anything that can be displayed on my monitor, but the penalty is unnecessarily large image files.
Preparing
image files for display on the web
Some of the
things which apply to emailed image files also apply to images
prepared for web pages. You should consider doing the following to
images destined for web pages:
Adjust the size of the image to
the size you want it displayed on the web site. The alternative
is to use a larger or smaller image size than you actually want and
to specify the display size when you write the web page. In both
cases the image will be degraded, and in the case of using an image
size larger than the display size the image will take longer than is
necessary to download.
Adjust the compression of the image file
so as to make the image file size smaller. You might be able to
achieve a file size of one fifth of the original size without making
a noticeable difference to the quality of the image. Smaller file
sizes mean faster downloads.
Use a sharpening process after
changing the size of an image. Most image editing programs allow
you to do this. Be careful not to go too far.
|
|
|